Target Value Variable
What is a Target Value variable?
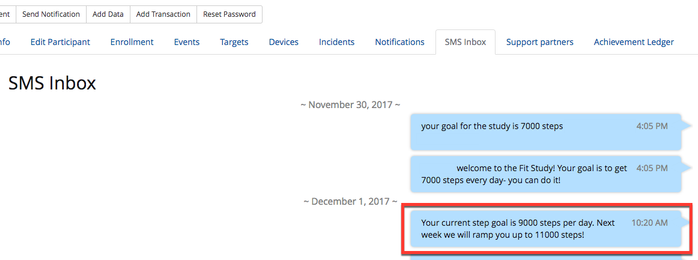
A Target Value variable is a custom variable type that allows you to evaluate a participant's past, current, or future target. With the Target Value variable, you can set targets, create ramp up periods, modify the target in event logic or send a notification to the participant about their target. What's so great about this? Well, as shown in the example below, you can tell the participant what their step goal is for this week and what it will be the following week.
How do I set up a Target Value variable?
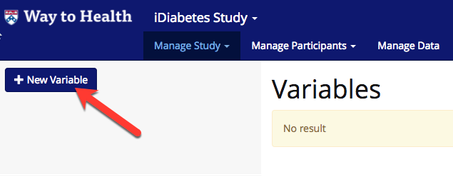
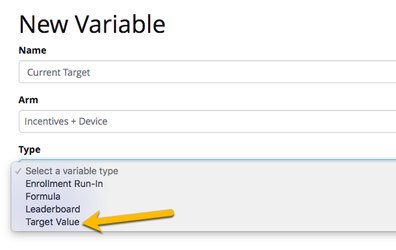
- Navigate to Manage Study --> Variables
- Click '+ New Variable'.
- Give the variable a friendly name.
 Tip! Choose something that you will remember when you are building the variable into target modifications or participant messaging and incidents.
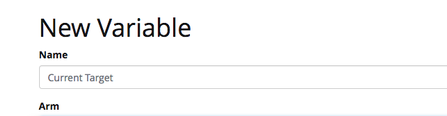
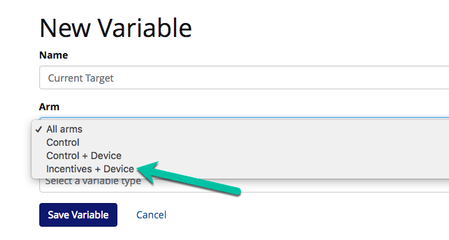
- Select the arm. You can only select arms that have targets configured. Need help with setting up targets? See Targets for more details.
- Next select the variable type. For this example, we want to select Target Value.
- Once you select Target Value, additional fields will display.
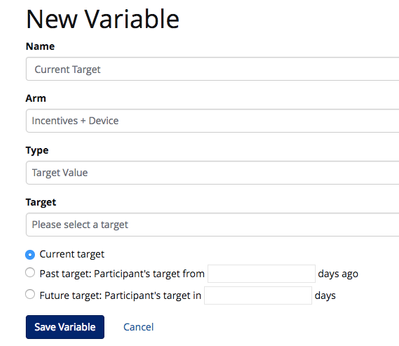
- In the 'Target' drop-down, all available targets for that arm will display. Select the appropriate target.
 Don't see any targets listed? First you need to set them up! Navigate to Mange Study --> Target Configuations
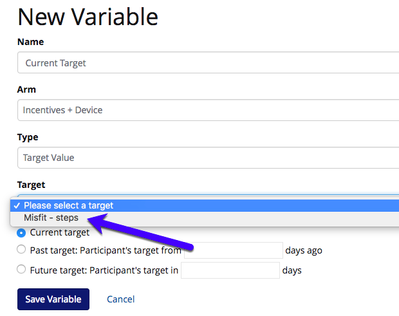
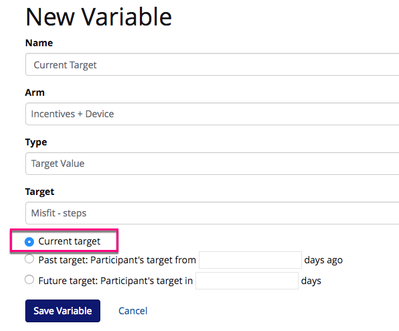
- Finally, select the evaluation 'date' for the target. In this example, we want the current target, e.g. what the participant's target is right now.
- Tip! Want to tell the participant what their target will be in 7 days? Select Future and input '7' into the text box.
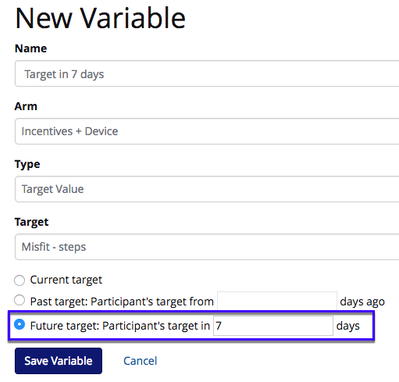
- Click 'Save Variable'
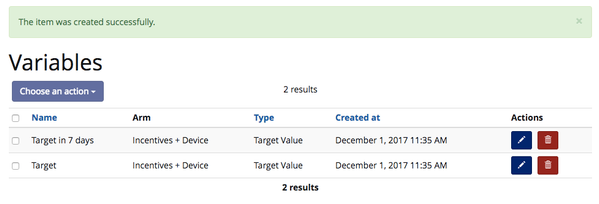
- Your new variable will be listed on the Variables overview page.
- You are now ready to use your newly created Target Value variable! The messaging options are endless!
How do I use a Target Value variable?
In Messaging:
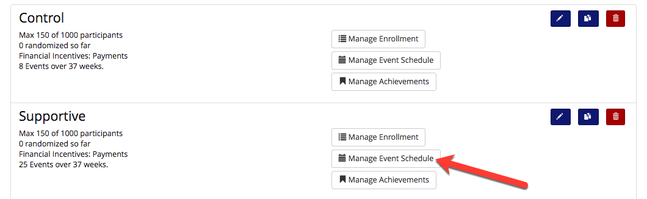
- Navigate to Study Arms under Manage Study. Click 'Manage Event Schedule'. Remember to select the arm for which the new variable was created.

- Either create a new event or edit an existing event. You can inclue your new variable on event creation or in the logic screen.
- Imagine the following scenario: I want to tell a participant what their current goal is and what their goal will be the next week.
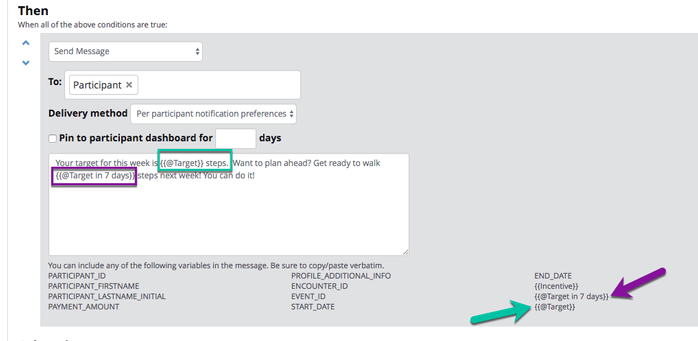
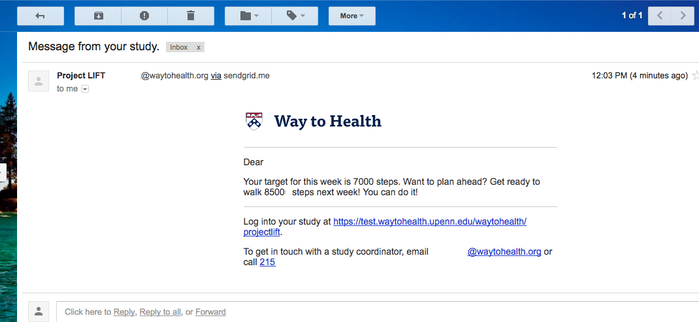
- When the participant receives this message, the variables will be replaced with their current target value and target value in 7 days.
- Click 'Save' Logic'
- WARNING If you change the name of your available after it has been added to a message or incident text box, it will NOT update, and you will need to manually update it. Therefore once you create your variables and add them into messaging, we recommend keeping the original name.
Setting targets:
- Navigate to Study Arms under Manage Study. Click 'Manage Event Schedule'. Remember to select the arm for which the new variable was created.
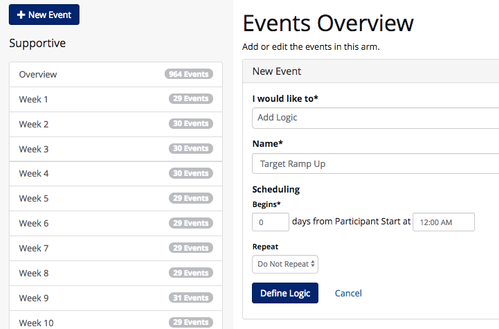
- Either create a new 'Add Logic' event to for Day 0 at 12 am. This will allow you to set the participant's target as soon as they are randomized and started in the study.
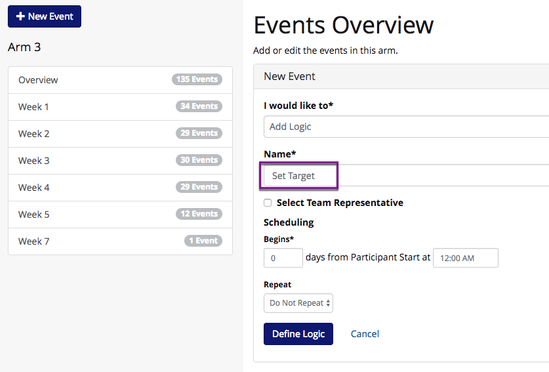
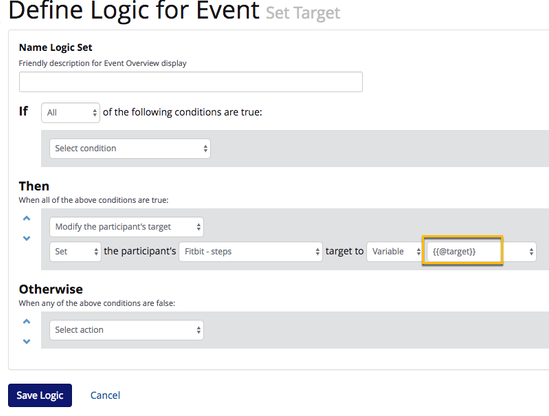
- In the event logic screen, select the action, 'Modify Participant's Target'.

- Select 'Set' and choose your target. Then set target to your defined target variable, {{ @target }}
- Additionally, you can also add a 'send a message' action to notify the participant of their step goal for their study.
- Click save logic.
Creating ramp-up periods from baseline value to target value:
Imagine the following scenario: A participant completes a 2-week run in period and has an average step count for those 2 weeks, e.g. 8,000 steps. The participant is told their average and asked to pick a goal. The participant selects a goal of 10,000 steps. We want the participant to reach a goal of 10,000 steps, but that's not going to happen over night! So what do you do?! Ease them into that new goal by setting up a ramp-up period! In this scenario, we want to give the participant 1 week to ease up to 10,000 steps.
The participant's step goals should be as follows,
- Averaged 8,000 steps during baseline run-in period
- Days 0-6 in the intervention- 9,000 steps
- Days 7 - end of study - 10,000 steps
![]() "STOP, COLLABORATE, AND LISTEN": In order to configure the ramp up in the event schedule, targets and variables MUST be set up ahead of time!
"STOP, COLLABORATE, AND LISTEN": In order to configure the ramp up in the event schedule, targets and variables MUST be set up ahead of time!
- Create your targets
- In this scenario we will need to set up a targets, Study Arm Target to look at the pedometer step count data
- In this scenario we will need to set up a targets, Study Arm Target to look at the pedometer step count data
- Create new variables
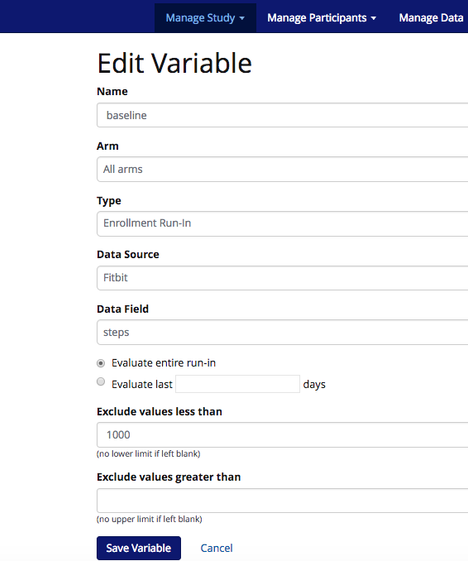
- Baseline - this will be the Enrollment Run-In Variable variable that calculates the average step count during the 2-week run-in period.
- Example set up:
- Example set up:
- Final selected goal- this is variable that will look at the goal value that the participant selected. In this example, the participant's final selected goal will be 10,000 steps.
- When setting up this Survey-Based Value variable, select the 'Survey Based Value' variable type and 'Goal Selection Survey' and 'goal_value' for the evaluation.
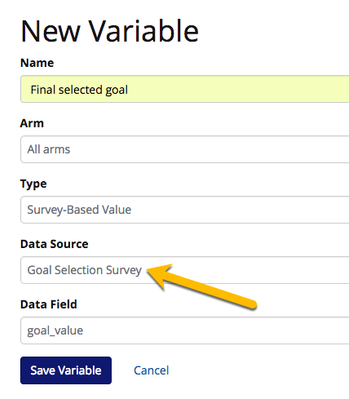
- When setting up this Survey-Based Value variable, select the 'Survey Based Value' variable type and 'Goal Selection Survey' and 'goal_value' for the evaluation.
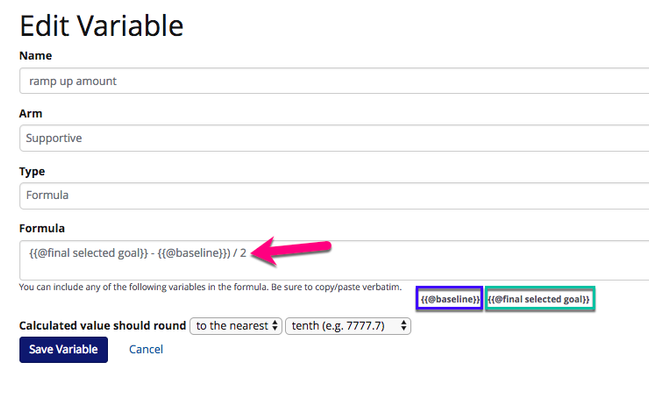
- Ramp up amount- this is the Formula Variable that is going to do the division needed to determine how much the step goal should increase each week until the final goal is achieved.
- Select 'Formula' as the variable type and use the baseline and final selected goal created in steps a and b to calulate the ramp up amount
- Set up the formula as {{ final selected goal }} - {{ baseline}} / X, where X = # of weeks in ramp up. In this example, there is a 2 week ramp up
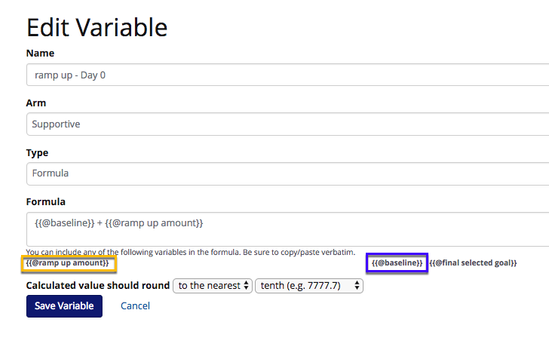
- Ramp up amount - Day X- this is the Formula Variable that will allow you to set up the ramp up at designated time points.
- In this scenario, we need 2 ramp up amounts, Ramp up amount - Day 0 and Ramp up amount - Day 7.
- Select 'Formula' as the variable type and use the baseline and Ramp up amount created in steps a and c to calulate the ramp up value for Day 0
- Set up the formula as {{ baseline}} + {{ Ramp up amount }} and save the variable
- Repeat i - iii for ramp up - Day 7, except now we want to look at {{ ramp up - Day 0}} rather than {{ baseline }}.
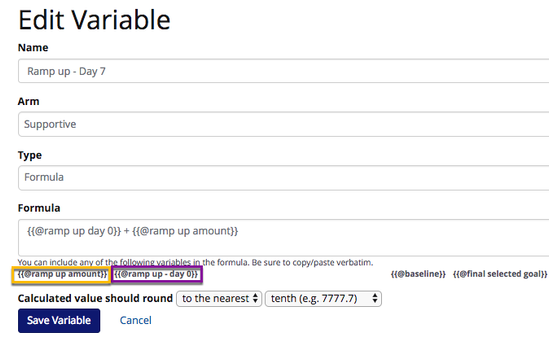
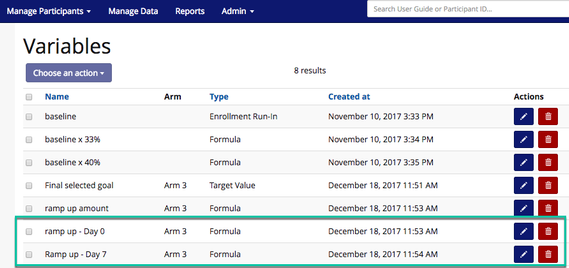
- Save each raamp up variable and view on the Variables page.
- Baseline - this will be the Enrollment Run-In Variable variable that calculates the average step count during the 2-week run-in period.
- Build ramp ups into event schedule
- Navigate to Study Arms and click 'Manage Event Schedule'. Remember to select the arm for which the new variable was created.
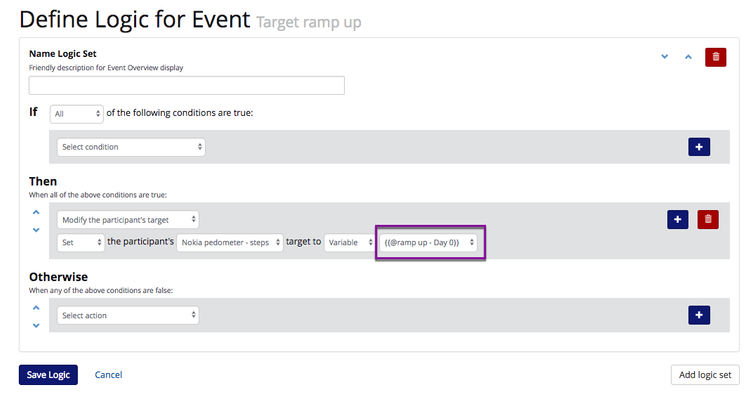
- Setting target: Create a new 'Add Logic' event for Day 0 at 12 am called Target Ramp Up.
- In the logic screen, select 'Modify participant's target'. Set the participant's target to the variable, {{ ramp up - Day 0 }}
- Adding ramp up: Create a 'Add Logic' event for Day 7 at 12 am called Target Ramp Up 2.
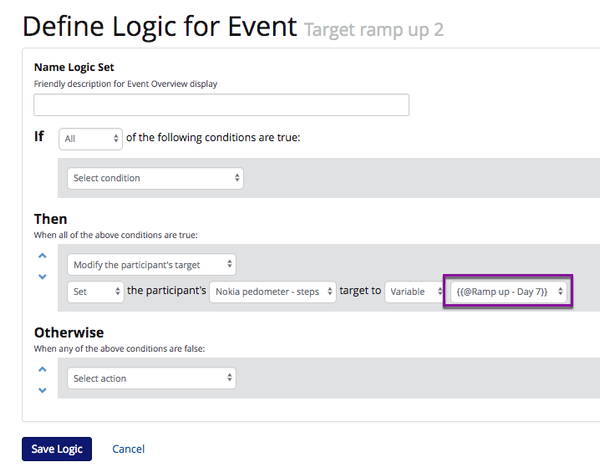
- Repeat c. for any additional ramp ups, e.g. Target Ramp up 3 on Day 14 at 12 am.
- Set final target: Create a 'Add Logic' event for Day 14 at 12 am called Target Ramp Up Final Goal. This will be the goal that the participant selected, in this case, 10,000 steps. Unless later modified, this will be the participant's step goal for the reminder of the intervention.
- In the logic screen, select 'Modify participant's target'. Set the participant's target to the variable, {{ Final Selected Goal }}
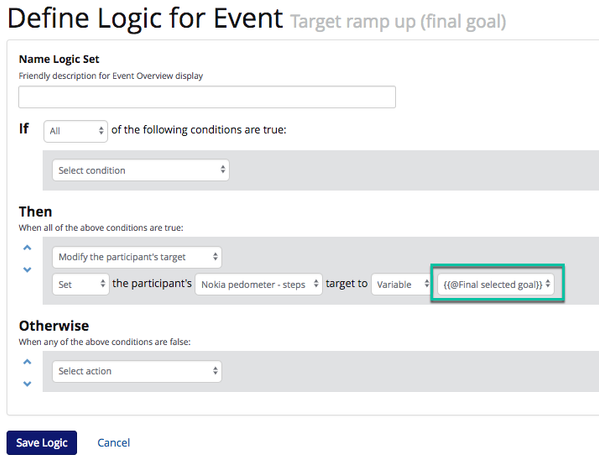
- In the logic screen, select 'Modify participant's target'. Set the participant's target to the variable, {{ Final Selected Goal }}
 Hooray, you are all done! You have created a ramp up period from baseline steps to goal steps for your participants. This will give them a few weeks to get used to exercising more.
- Navigate to Study Arms and click 'Manage Event Schedule'. Remember to select the arm for which the new variable was created.