Managing Your Caseload
- Former user (Deleted)
- Sarah.Milinski
- Neda Khan (Unlicensed)
Once your project is built, tested, and launched with real participants, your team will need to manage your WTH site. The following information includes some tips and tricks on how to maximize the features that Way to Health offers in order to smoothly and efficiently run a project on the platform.
Study Dashboard
When you log into your study, the first thing that you will see is the study dashboard. This gives you a snapshot into what's happening in real-time!
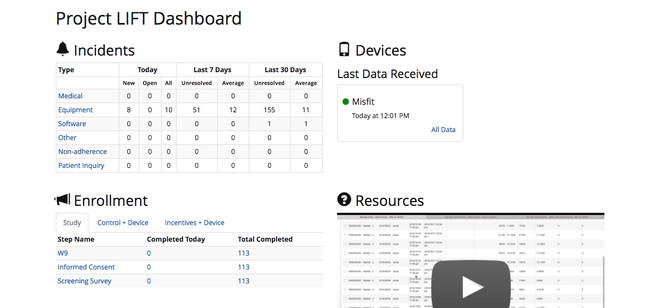
So let's check out the different sections!
Incidents
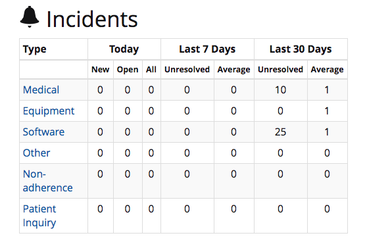
- Filtered by incident type
- Why is this so great? It allows you to address the medical incidents first and then move on to the less critical incident types.
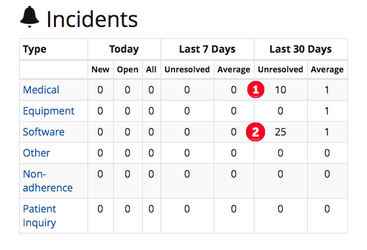
- Want to take a look at the medical incidents more closely? Click 'Medical' and you will see only the outstanding medical incidents.
- The most recent medical incident will be displayed at the top of the list.

- The most recent medical incident will be displayed at the top of the list.
- Why is this so great? It allows you to address the medical incidents first and then move on to the less critical incident types.
- Quickly view any outstanding incidents that need to be reviewed and handled per study protocol
- Sees incident trends over the past day, week, and month
Devices
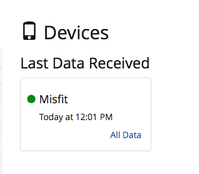
The Devices snapshot shows you the last time that the platform received device data. This allows you to quickly identify if data has stopped flowing properly into the platform.
For example, if the study hasn't received pedometer data since yesterday, that might indicate a problem and suggest further inquiry is needed.
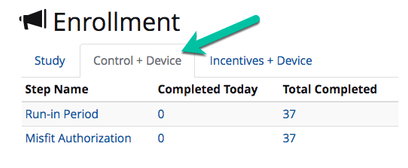
Enrollment
Composing those pesky recruitment reports can be so time-consuming! The enrollment section gives you a glimpse into how close you are to meeting enrollment milestones and quickly report out on recruitment numbers.

![]() Tip! Click on the 'Completed Today' or 'Total Completed' number to take you to the Filter Events page. This will allow you to see who has completed that specific enrollment step and when they completed it.
Tip! Click on the 'Completed Today' or 'Total Completed' number to take you to the Filter Events page. This will allow you to see who has completed that specific enrollment step and when they completed it.

Have arm-specific enrollment steps? You can even filter by those steps by clicking the study arm.
Resources
We want to make sure that you have all of the tools that you need to be successful. This section includes links to the User Guide.

Choose your Manage Participants View!
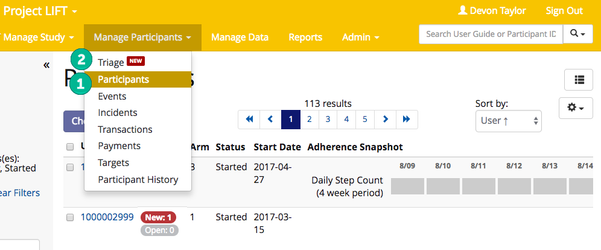
You have two options to choose from:
- To kick it old school, select 'Participants' from the Manage Participants drop-down
- This view will show you the Way to Health that you know and love
- This view will show you the Way to Health that you know and love
- To get to speed with the latest and greatest, select 'Triage View' from the Manage Participants drop-down
- We may be biased but we think that this new view is the way to go! The Triage View allows you to manage participants by exception. This means that you are only seeing participants who need to follow up with or take action on based on open and new incidents.
- We may be biased but we think that this new view is the way to go! The Triage View allows you to manage participants by exception. This means that you are only seeing participants who need to follow up with or take action on based on open and new incidents.
Why Triage View?
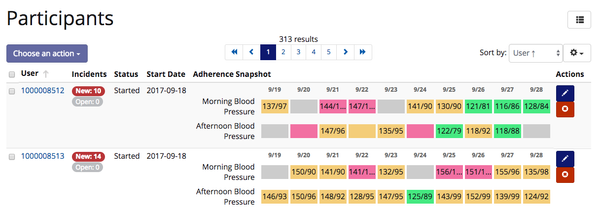
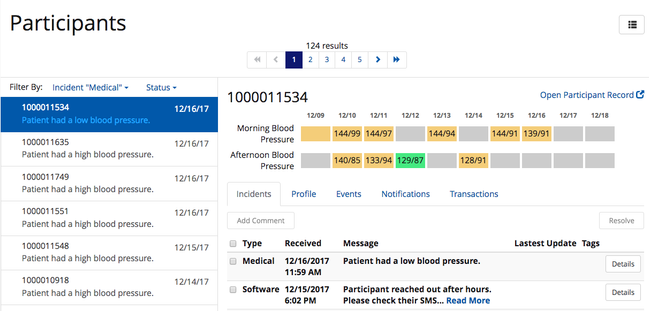
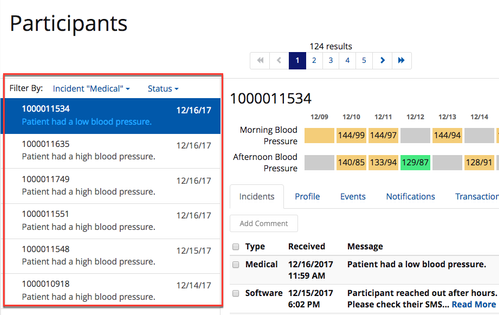
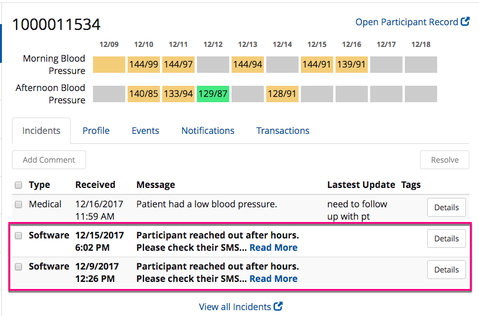
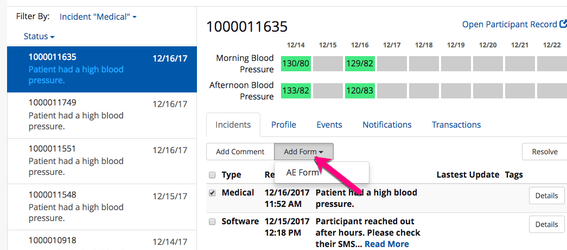
- Manage participants by exception: only see those with outstanding unresolved incidents. View incidents that require action on the left hand panel.
- From here you can see which participant triggered the incident, when, and what incident was triggered.
- From here you can see which participant triggered the incident, when, and what incident was triggered.
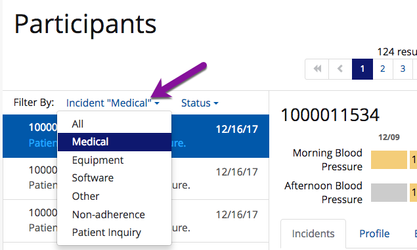
- You have the ability to filter by incident type. This allows you to prioritize medical incidents over equipment incidents.
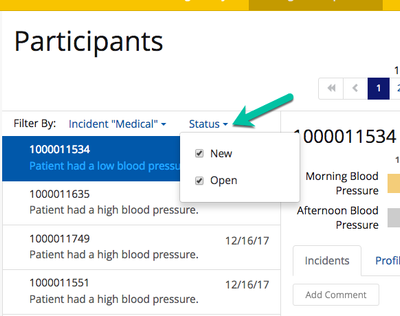
- You can also filter by incident status. This allow you to prioritize New incidents over Open incidents.
- New: Incident has not been read or commented on
- Open: Incident has been read, commented on, but is still pending closure by study team.
- Select the incident that you want to explore further by clicking on the incident from the left-hand panel.

- Once you select the incident, you will see that incident as well as any other New or Open incidents for that participant.
- If an incident is New, it will be listed in bold.
- If an incident is Open, it will be listed in regular text size. You can see the latest updates on this incident
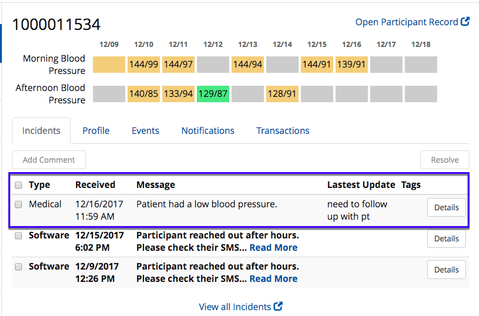
- If an incident is New, it will be listed in bold.
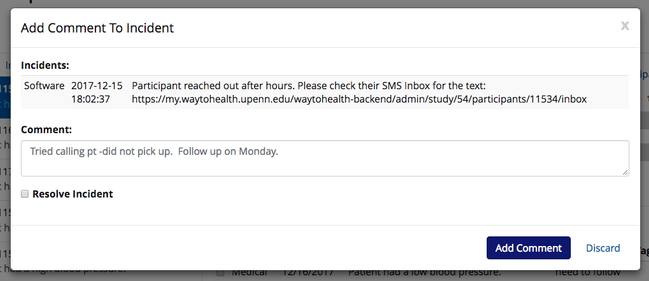
- You are now ready to take action on any New or Open incidents. To do this select the incident.
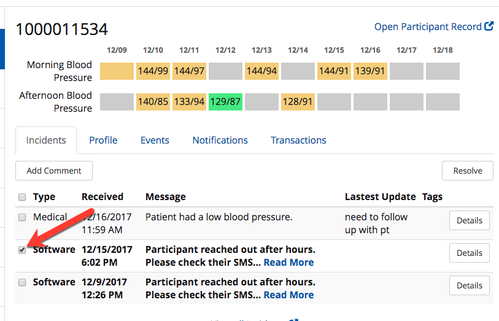
- If the incident still requires follow-up or you want to add a note, click Add Comment.
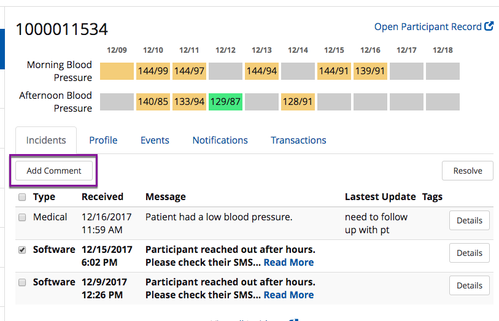
- The comment can be added by clicking Add Comment. The incident can also be resolved by selecting the Resolve Incident checkbox.
- The comment can be added by clicking Add Comment. The incident can also be resolved by selecting the Resolve Incident checkbox.
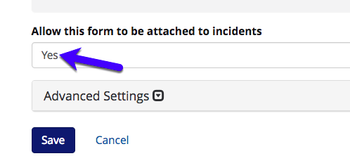
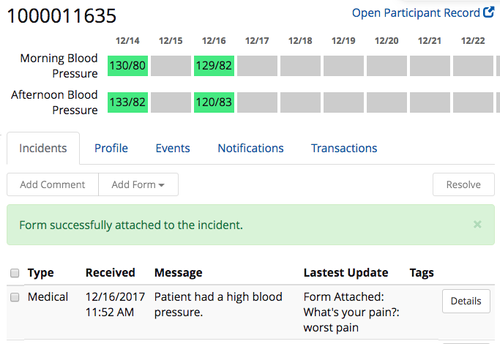
- You also have the ability to attach forms or surveys to the incident.

- To create a new form, navigate to the Data Sources page. Create your new Internal Survey and select the ability to attach to incidents.
- Once you have created your form, go back to Manage Participants and add the form to the incident.
- When you select the form, the form fields that you built will display and you can complete the form.
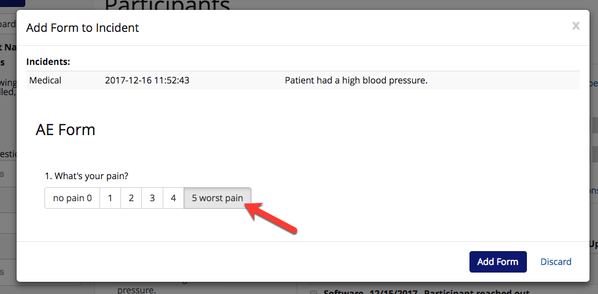
- Once completed, the form will be visible from the Incident view.
- To create a new form, navigate to the Data Sources page. Create your new Internal Survey and select the ability to attach to incidents.
- If the incident can be closed out and no longer requires follow-up, click Resolve.

- By clicking Resolve, that will remove the incident from your view.
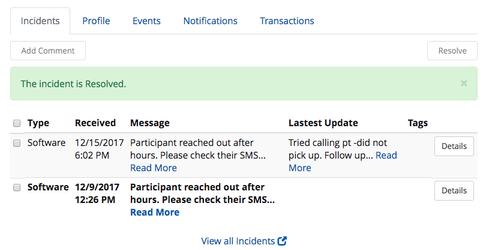
- By clicking Resolve, that will remove the incident from your view.
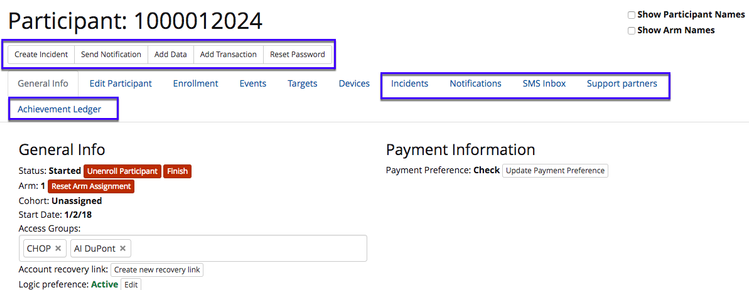
- To quickly access a participant's contact information, click the Profile tab.
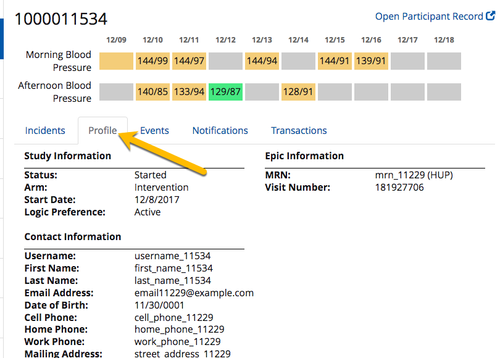
- You can also access their full profile by selecting Open Participant Record.
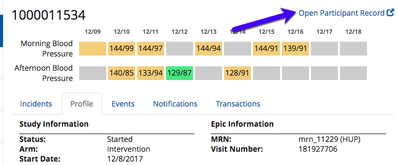
- You can also access their full profile by selecting Open Participant Record.
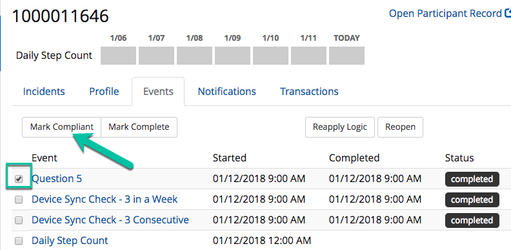
- The Events tab allows you to view each event that the participant has received per their schedule. The most recent events will be on top.
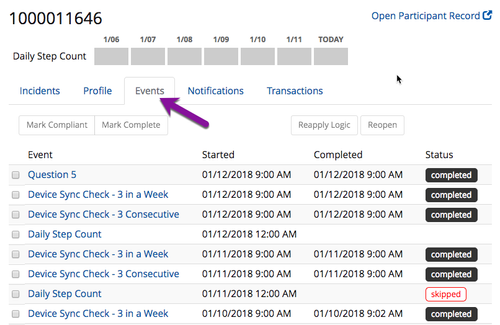
- Instead of having to go to Filter Events, you can now reapply logic, mark events as complete or compliant, reopen closed events right from this view! To do this, select the event, and choose the appropriate action.
- Instead of having to go to Filter Events, you can now reapply logic, mark events as complete or compliant, reopen closed events right from this view! To do this, select the event, and choose the appropriate action.
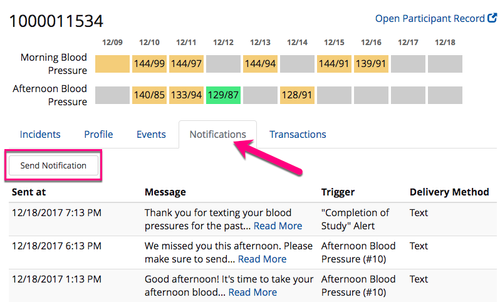
- The Notifications tab allows you to see all messages that the participant has received from the platform. From here you can also send the participant a one-off message via Send Notification. This will send them a message via the notification preference defined in their profile.
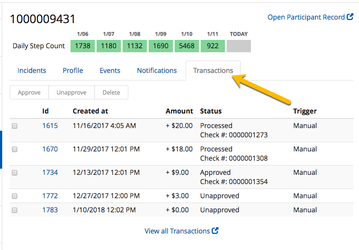
- The Transactions tab allows you to view all payments that the participant has received to date. Need to reissue a check? You can do that right from this view! See How to Stop Payment and Reissue a Check for more details.
Understanding a participant profile
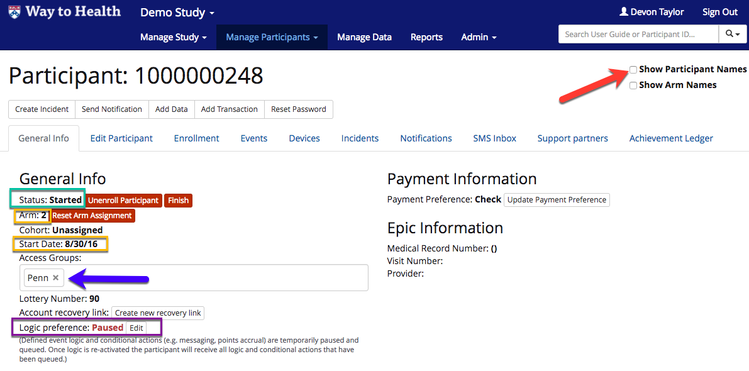
- All information about a participant can be collected or viewed in their profile. On the General Info tab, you can,
- View contact information by clicking 'Show participant name & profile'
- Pause or disable feedback
- View status (enrolling, ready, started, etc.)
- View arm assignment, if randomized, and start date, if started
- View Access Groups
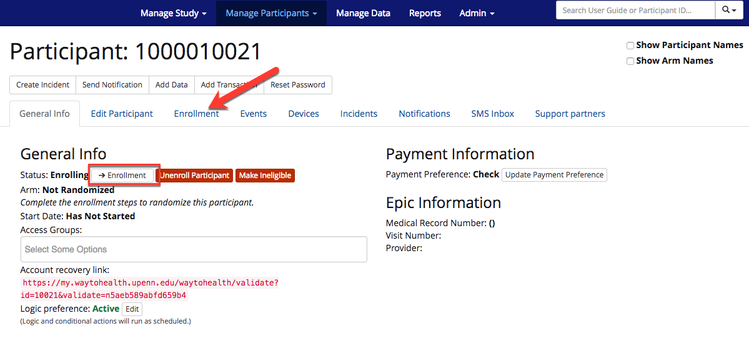
- For enrolling participants, you can,
- View enrollment progress or complete enrollment
- Click the Enrollment tab or Enrollment button
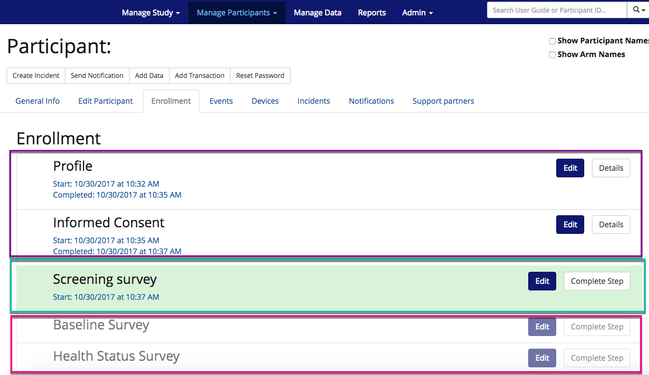
- White = completed step
- Green = open step
- Grey = unavailable, locked step; participant has to complete a pre-requisite
- Click the Enrollment tab or Enrollment button
- View enrollment progress or complete enrollment
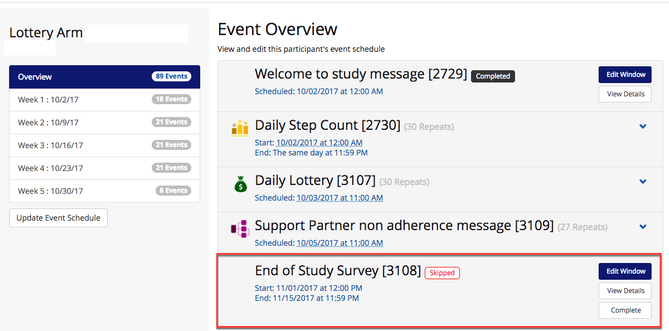
- For started participants, you can view their event schedule.
- Note: Participants will not have an event schedule until they are randomized to an arm.
- Click the Event tab.
- You can view the entire event schedule, or "to-dos", that the participant will have while in the intervention.
- You can jump to a specific week
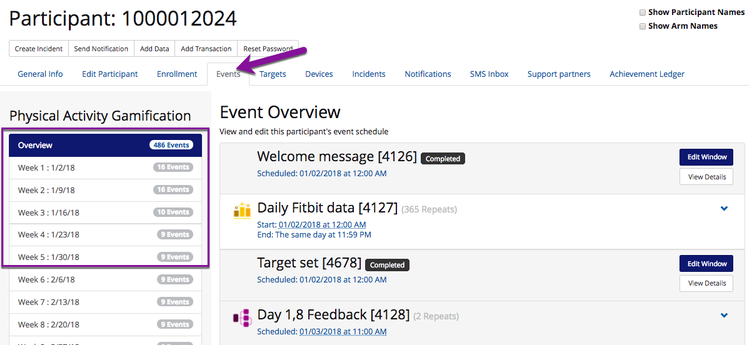
- You can jump to a specific week
 Tip! Learn the event statuses!
 - Blue box: The event is open and the participant can complete it.
- Note: Depending on the event setup or the type of event, the event will either
- Close immediately following completion
- Ex: Lottery runs, participant fills out a survey, etc.
- Closeout at the end of the event window
- Ex: Fitbit device upload is open all day and closes, and midnight
- Close immediately following completion
- Need to reschedule an open event? Click the Reschedule
- SeeRescheduling Participant Events for more details

- SeeRescheduling Participant Events for more details
- Note: Depending on the event setup or the type of event, the event will either
- Gray box: If a participant completed an event (i.e. synced their Fitbit), when the event closes, the box will turn gray.
- Want more information on a completed event? Click the details button!
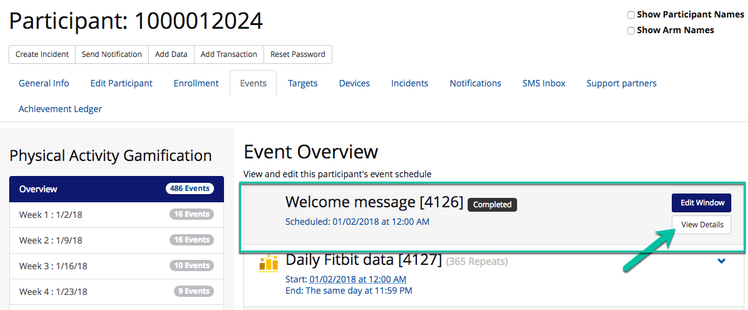
- Details view allows you to see:
- When the event was open, or the 'event window'
- When the event was completed
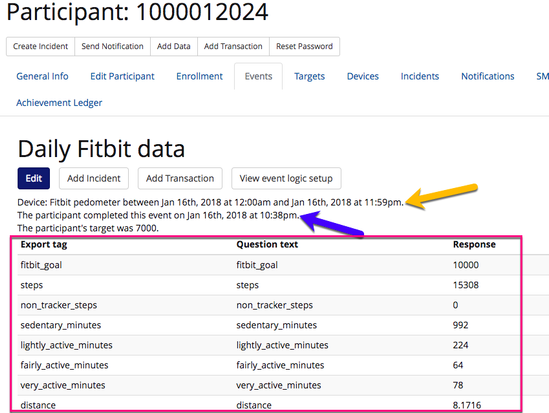
- Data collected (i.e. from Fitbit device, survey responses, etc.)
- Want more information on a completed event? Click the details button!
- Red Skipped: If a participant did not complete an event (i.e. did not fill out the end-of-study point survey), the event will be marked as skipped as indicated by the Red Skipped label.
- White box: A future event that the participant has not reached yet and therefore is not open.
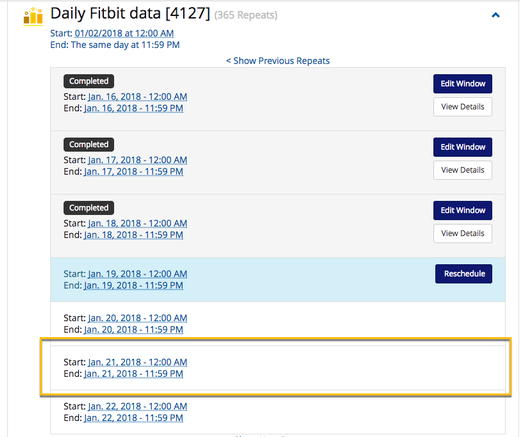
- Blue box: The event is open and the participant can complete it.
- You can view the entire event schedule, or "to-dos", that the participant will have while in the intervention.
- Complete events as an admin.
- Need to complete a survey for a participant?
- Click the Complete button.
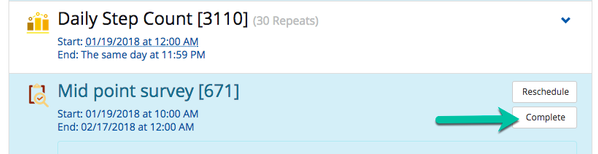
- Click the Complete button.
- Need to complete a survey for a participant?
- View a participant's device in the Devices tab.
- Tip! Need help troubleshooting a participant's device or want more information on devices? See Device Troubleshooting for more information!

- From the navigation, you can also
- View and add new incidents associated with the participant
- View batch Nnotifications sent to the participant
- View their SMS Inbox, if bi-directional SMS is enabled
- View Achievement Ledger - points and levels to date
- View and add Support Partner information
- Add a manual transaction
- Reset their dashboard password
- Tip! This is no longer needed as participants can reset their own passwords from the participant-facing dashboard. However, it can be useful during the testing phase!
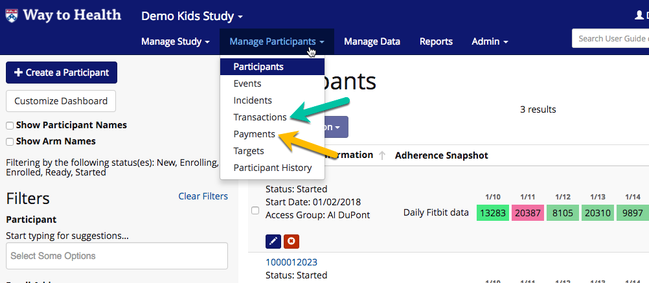
Managing participant payments
- Under the Manage Participants tab, you will see two sections, 'Transactions' and 'Payments'.
- Transaction- represents a payment to a participant-generated by feedback that must be approved by the study staff.
- Payment- a check made out to a participant processed by Wells Fargo and created from an approved transaction.
- In order to pay your participants, you need to approve transactions.
- Navigate to Transactions.
- Filter for Approved --> No to display only transactions that have not been approved.
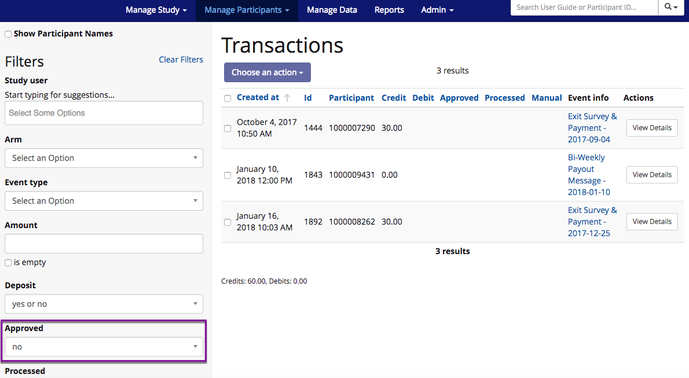
- Select the transactions to approve and click Approve from the Choose an Action dropdown.
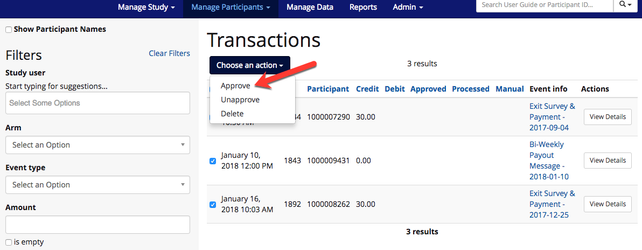
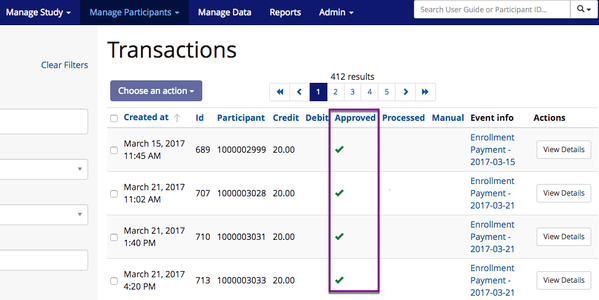
- Once approved, a green check mark will appear in the 'Approved' column.
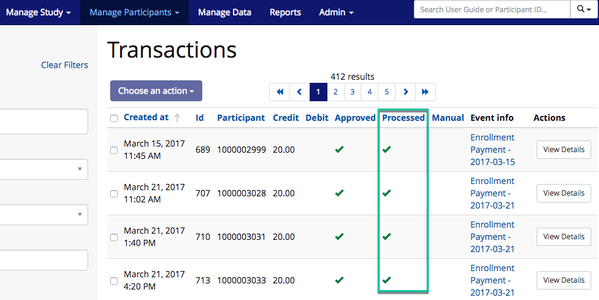
- The following day, a green check mark will also appear in the Processed column. This means that the check was cut by Wells Fargo and was mailed out to the participant. The participant will also receive a notification from Way to Health indicating that a check is being sent to them, along with the check total.
- Note: Is your project using manual transactions? If so, you will need to have Project Manager permissions in WTH to approve these transactions.
- Tip! What happens if a participant indicates that they did not receive their check? See Stop Payment and Reissue a Check for more information!
Using Manage Data
- The Manage Data tab allows you to see data from sources (surveys, devices) in real-time. This can be particularly useful if you are trying to troubleshoot a device with a participant or view responses to a recently completed survey.
- How is Manage Data different than reports? Reports run once per day- every morning around 1 am. Whereas Manage Data displays data as soon as it is received in Way to Health.
- How is Manage Data different than reports? Reports run once per day- every morning around 1 am. Whereas Manage Data displays data as soon as it is received in Way to Health.
- Filter for Source (i.e. Fitbit) and select a participant or leave it blank to get data on all participants. Scroll down and click the Filter button.
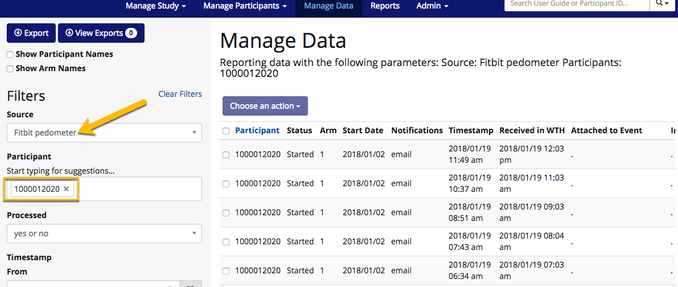
- View data on the participant.
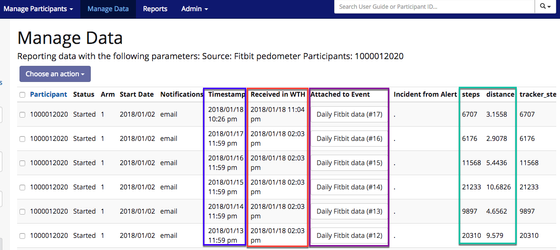
- Tip! Understand the Manage Data columns
- Timestamp- the date and time that the participant sent in data (ex: synced their Fitbit)
- Received in WTH- the date and time that the data flowed into Way to Health. This time may match the Timestamp time, or may have a slight lag of a few minutes.
- For devices like pedometers, if the participant syncs well after the event closes (i.e. a couple of days late), the 'Received in WTH' date will be very different from the Timestamp date.
- Attached to Event- The data was linked to an event and the event is now marked as 'complete' and feedback was applied.
- Additional columns (i.e. steps, distance, etc.) are specific to each device.
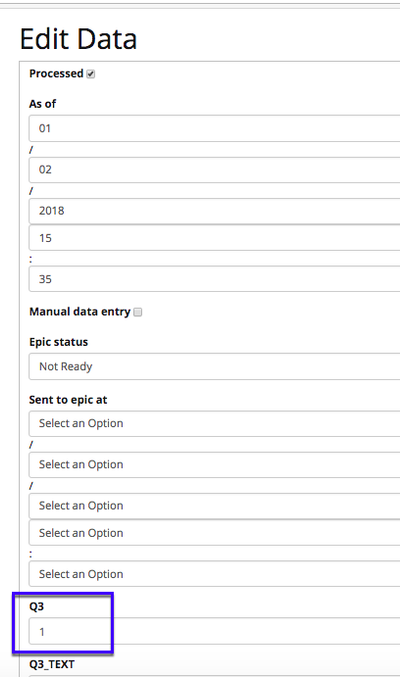
- Edit data
- STOP ! Data should only be edited in rare cases. In general, we don't want to alter the data in order to preserve project integrity!
- If you have Project Manager credentials, you have the ability to edit the data.
- Tip! This is particularly useful if a participant answers a survey question incorrectly and you want to update it to reflect their true response.
- Click the blue pencil icon under Actions.
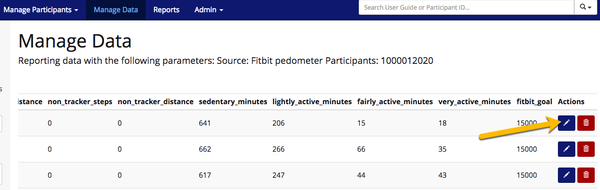
- Update the coded response, add an incident for changing the data, and click 'Save'.